2026. 6. 2. 14:35ㆍAI/LLM
앞서서 Transformer의 pipeline 함수를 이용해 텍스트를 이용한 여러 태스크를 알아봤었다.
이번엔 이미지 관련된 태스크를 알아볼 예정인데, 이러면서 나오는 개념이 멀티 모달이다.
멀티 모달이란, 여러 종류의 데이터를 처리하는 AI 개념이다.
멀티 모달 종류에는 다음과 같은 종류가 있다.
- 텍스트 + 이미지
- 음성 + 텍스트
- 영상 + 텍스트
- 이미지 + 텍스트
이런 것을 하기 위해서 이미지 처리를 어떻게 할 것인지 필요한데 이미지 관련 태스크를 가져오면 될 것이다.
허깅 페이스(Hugging Face)에 접속해서 태스크 및 모델을 찾을 필요가 있다.
Hugging Face – The AI community building the future.
We’re on a journey to advance and democratize artificial intelligence through open source and open science.
huggingface.co
먼저 Models 탭에 들어간다.

검색 항목에서 Tasks 항목에 들어간다.

여기서 이미지 분류(Image Classification)을 선택해보자.

선택 후, 옆 레이아웃에 있는 여러가지 모델들을 확인하면 될 것 같다.
여기서 뭐가 잘 되는지는 테스트를 해 봐야 안다.
코드 창으로 돌아가서 pipeline 코드를 작성해보자.
from transformers import pipeline
from PIL import Image

image = Image.open("./sample_concert.gif")
classifier = pipeline("image-classification") # 모델 선택하지 않을 경우 기본 모델 가져옴
result = classifier(image)
print(result)
코드에 대한 설명을 하자면, 가져온 이미지를 Image-Classification 태스크에 맞춰 파이프라인을 거쳐
나온 결과를 출력해주는 코드이다. 결과 예시는 다음과 같다.
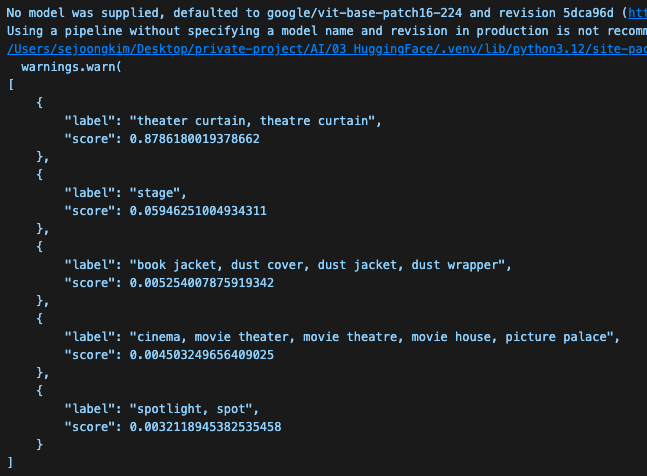
위에 나오는 경고 콘솔은 model이 선택되지 않아 기본 모델을 선택한다는 뜻으로 무시해도 된다.
결론적으로 위와 같이 분석해서 JSON 형태로 출력해주는 걸 확인할 수 있었다.
그 다음으로, 많이 하는 Tasks가 이미지에 캡션 넣어주는 것(Image-to-text)이다.
다음과 같은 코드를 작성해보자.
역시 샘플 테스트이므로, 모델은 기본 모델로 사용할 것이다.
from transformers import pipeline
from PIL import Image
import json

capper = pipeline("image-to-text")

image = Image.open("./sample_concert.gif")

result = capper(image)

print(json.dumps(result,indent=4,ensure_ascii=False))
이제 그 다음으로 많이 하는 것은 텍스트를 통해 이미지로 생성하는 태스크이다.
이 개념을 주로 스테이블 디퓨전(Stable Diffusion)이라고 부른다.
이미지를 생성할 때 이미지를 처음부터 만들어주는 것이 아니라, 점점 이미지를 좋아지게 만드는 개념이다.
즉, 처음에는 노이즈 같은 이미지부터 시작해서 텍스트를 입력해서 텍스트 의미를 이해해서
점차적으로 노이즈를 제거하고 이미지를 완성하는 개념인 것이다.
여기서 GPU 기반으로 움직이면 빨리 결과가 도출되는 듯 하다.
Google Colab 같은 외부 환경에서는 런타임 유형 변경 설정이 필요하나,
필자는 GPU 기반 맥북에서 진행하고 있으므로, 이 부분은 넘어가도록 하겠다.
일단, Diffusers 개념이 필요하므로, 새로운 패키지를 설치할 필요가 있다.
pip install diffusers==0.29.2 peft==0.11.1
그리고 다음과 같은 코드를 작성해보자.
from diffusers import StableDiffusionPipeline
import torch

pipe = StableDiffusionPipeline.from_pretrained("runwayml/stable-diffusion-v1-5", torch_dtype = torch.float16)

# Use Apple Silicon GPU acceleration
pipe = pipe.to("mps")

image = pipe("서울의 밤 풍경").images[0]

image.save("./saved/seoul.png")
결과 이미지는 개인보다 다르므로, 직접 확인해보길 바란다.
이제 다음은 오디오 처리 중 음성을 텍스트로 바꾸는 것에 대해 알아보자.
허깅 페이스(Hugging Face)에서는 다음과 같은 태스크에 속한다.

여기서 많이 쓰는 태스크 개념이 whisper이다.
모델을 보면 whisper 기반으로 만들어진 모델들이 많다.
다음과 같은 코드로 테스트해보자.
from transformers import pipeline
import json

whisper = pipeline("automatic-speech-recognition", model="openai/whisper-base")
result = whisper("../data/obama.mp3", return_timestamps=True)
print(json.dumps(result,indent=4,ensure_ascii=False))
음성이 너무 길어, timestamp로 분리하여, chunks 설정을 통해 문장 별로 분리한 상태이다.
반대인 Text to Speech는 경량 TTS 모델들을 이용할 수가 있는데 간단히 테스트해보자.
import edge_tts

text = "안녕하세요 반갑습니다"
voice = "ko-KR-SunHiNeural"

output_file = "./saved/voice.mp3"

async def main():
    communicate = edge_tts.Communicate(text, voice)
    await communicate.save(output_file)

await main()
결과물들은 직접 확인해서 테스트해보길 바란다.
그럼 위에서 공부했던 개념들을 통해 간단한 웹앱을 만들어보자.
필자는 Next.js로 프론트엔드 화면단을 만들고, FastAPI로 백엔드 API 서버단을 구성했지만,
화면단 구현이 부담스러운 사람들은 Gradio나 Streamlit 같은 웹 프레임워크를 사용해도 좋을 것 같다.
목표 화면은 다음과 같다.
위 화면을 위해 구현한 Next.js 코드는 다음과 같다.
app/page.tsx
import ChatBox from "@/components/ChatBox";
export default function Home() {
return (
<main>
<div id="wrap" className="w-[1080px] mx-auto">
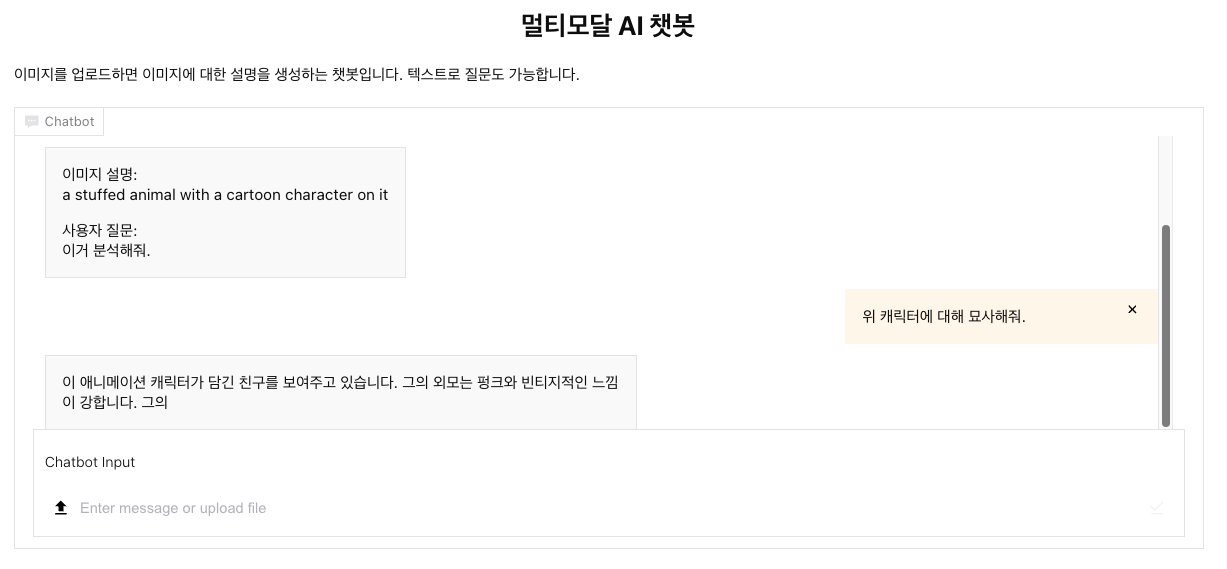
<h2 className="text-center">멀티모달 AI 챗봇</h2>
<p className="text-[14px] mb-[20px]">이미지를 업로드하면 이미지에 대한 설명을 생성하는 챗봇입니다. 텍스트로 질문도 가능합니다.</p>
<ChatBox />
</div>
</main>
)
}
app/components/ChatBox.tsx
"use client";

import React, { useRef, useState, useEffect } from "react";
import { IoChatboxEllipsesSharp } from "react-icons/io5";
import { MdFileUpload, MdOutlineFileDownloadDone } from "react-icons/md";
import ChatMessage from "./ChatMessage";
import ImageUrlBox from "./ImageUrlBox";

export interface ChatBoxMessages {
    chat_id: string;
    message: string;
    fileUrl: string;
    isMe: boolean;
    timestamp: string;
}

export default function ChatBox() {
    const [chatMessage, setChatMessage] = useState<string>("");
    const [imageUrl, setImageUrl] = useState<string>("");
    const [inputHeight, setInputHeight] = useState<number>(0);
    const [chattingArray, setChattingArray] = useState([]);
    const [isLoading, setIsLoading] = useState<boolean>(false);
    const [isInitialLoading, setIsInitialLoading] = useState<boolean>(true);
    const chatBoxRef = useRef<HTMLDivElement>(null);

    const handleChatMessageChange = (e: React.ChangeEvent<HTMLInputElement>) => {
        setChatMessage(e.target.value);
    }

    const fileRef = useRef<HTMLInputElement | null>(null);

    const fileClick = () => {
        fileRef.current?.click();
    }

    const localFileUpload = async (file: File) => {
        try {
            const formData = new FormData();
            formData.append('file', file);

            const response = await fetch(`http://localhost:8000/api/v1/file-upload`, {
                method: "POST",
                body: formData
            });
            const json = await response.json();
            setImageUrl(json.url)
        } catch (e) {
            console.log(e);
        }
    }

    const handleFile = async (e: React.ChangeEvent<HTMLInputElement>) => {
        const file = e.target.files?.[0];
        if (file) {
            await localFileUpload(file);
        }
    }

    const closeImageUrl = () => {
        setImageUrl("")
    }

    const getChatMessage = async () => {
        try {
            const response = await fetch("http://localhost:8000/api/v1/get-chat");
            const json = await response.json();
            setChattingArray(json);
        } catch (e) {
            console.log(e)
        } finally {
            setIsInitialLoading(false);
        }
    }

    const submitChat = async () => {
        try {
            const currentMessage = chatMessage;
            const currentImageUrl = imageUrl;

            const params = new URLSearchParams({
                message: currentMessage,
                fileUrl: currentImageUrl
            });
            await fetch(`http://localhost:8000/api/v1/add-chat?${params}`, {
                method: "POST",
                headers: {
                    "Content-Type": "application/json"
                }
            })

            setChatMessage("");
            setImageUrl("");
            await getChatMessage();

            setIsLoading(true);
            const llmParams = new URLSearchParams({
                message: currentMessage,
                fileUrl: currentImageUrl,
            });
            const response2 = await fetch(`http://localhost:8000/api/v1/llm-chat?${llmParams}`, {
                method: "POST"
            });
            const llmResult = await response2.json();
            console.log("LLM Response:", llmResult);

            // 백엔드에서 자동으로 저장되므로 리스트 새로고침
            await getChatMessage();
            setIsLoading(false);
        } catch (e) {
            console.log(e);
            setIsLoading(false);
        }
    }

    useEffect(() => {
        const updateInputHeight = () => {
            if (chatBoxRef.current) {
                setInputHeight(chatBoxRef.current.clientHeight);

            }
        };

        updateInputHeight();

        const observer = new ResizeObserver(updateInputHeight);
        if (chatBoxRef.current) {
            observer.observe(chatBoxRef.current);
        }

        return () => observer.disconnect();
    }, []);

    useEffect(() => {
        getChatMessage()
    }, [])


    return (
        <div id="chatBox" className="w-full h-[400px] border border-solid border-[#e7e7e9] relative">
            <div id="chatBoxLabel" className="w-[80px] h-[25px] border-r border-b border-[#e7e7e9] flex justify-center items-center gap-[5px] text-[#8d8b8f]">
                <IoChatboxEllipsesSharp color={"#e7e7e9"} size={14} />
                <span className="text-[12px]">Chatbot</span>
            </div>
            <div className="chatbox_contents w-[95%] mx-auto flex flex-col gap-[10px] overflow-y-auto" style={{ height: `calc(400px - 37px - ${inputHeight}px)` }}>
                {isInitialLoading ? (
                    <div className="flex items-center justify-center h-full text-[14px] text-[#8d8b8f]">
                        데이터 로드 중...
                    </div>
                ) : (
                    <>
                        {
                            chattingArray.map((chat: ChatBoxMessages) => (<ChatMessage chatContent={chat} key={chat.chat_id} onDelete={getChatMessage} />))
                        }
                        {isLoading && <div className="text-[14px] text-[#8d8b8f]">LLM 처리 중...</div>}
                    </>
                )}
            </div>
            <div id="chatBoxInput" className="p-[10px] w-[95%] border-[#e7e7e9] border absolute bottom-[10px] left-[0] right-[0] mx-auto" ref={chatBoxRef}>
                <h2 className="text-[13px] font-[300]">Chatbot Input</h2>
                {
                    imageUrl && <ImageUrlBox url={imageUrl} closeImageUrl={closeImageUrl} />
                }
                <div className="real__input flex mt-[20px] items-center f">
                    <input type="file" className="hidden" ref={fileRef} onChange={handleFile} />
                    <button className="w-[30px] h-[30px] flex justify-center items-center hover:bg-[#fafafa] cursor-pointer" onClick={fileClick}>
                        <MdFileUpload size={20} />
                    </button>

                    <input type="text" className="block h-[30px] outline-none flex-1 border-none box-border placeholder:text-[#bbbbc2]" placeholder={"Enter message or upload file"} onChange={handleChatMessageChange} value={chatMessage} />
                    <button className="w-[30px] h-[30px] flex justify-center items-center" disabled={!chatMessage.trim()} onClick={submitChat}>
                        <MdOutlineFileDownloadDone size={20} color={!chatMessage.trim() ? "#f5f5f5" : "#232323"} />
                    </button>
                </div>
            </div>
        </div>
    )
}
app/components/ChatMessage.tsx
import { IoClose } from "react-icons/io5";
import { ChatBoxMessages } from "./ChatBox";


export default function ChatMessage({ chatContent, onDelete }: { chatContent: ChatBoxMessages; onDelete: () => void }) {
    const deleteChat = async () => {
        try {
            const response = await fetch(`http://localhost:8000/api/v1/delete-chat?chat_id=${chatContent.chat_id}`, {
                method: "DELETE"
            })
            const json = await response.json();
            console.log(json);
            onDelete();
        } catch (e) {
            console.log(e);
        }
    }

    return (
        <div className={`relative flex flex-col text-[14px] border max-h-[150px] p-[15px] ${chatContent.isMe ? "bg-[#fef7ec] border-[#fef7e3] self-end w-[25%]" : "bg-[#fafafa] border-[#e7e7e9] self-start max-w-[50%]"} `}>
            {chatContent.fileUrl && (
                <img src={chatContent.fileUrl} alt="fileImage" className="w-[50px] h-[50px] object-cover mb-[10px]" />
            )}
            <span>{chatContent.message}</span>
            {chatContent.isMe && <button className="absolute right-[10px] top-[10px]" onClick={deleteChat}><IoClose /></button>}
        </div>
    )
}
app/components/ImageUrlBox.tsx
import { IoClose } from "react-icons/io5";

export default function ImageUrlBox({ url, closeImageUrl }: { url: string, closeImageUrl: () => void }) {
    return (
        <div id="imageUrlBox" className="w-[55px] h-[50px] border border-[#e5e5e5] border-solid flex justify-center items-center relative">
            <img src={url} alt="fileImage" className="w-[40px] h-[40px] object-cover" />
            <button className="absolute top-[0] right-[0] p-[0] cursor-pointer" onClick={closeImageUrl}>
                <IoClose />
            </button>
        </div>
    )
}
위의 코드 적용 시 구현되는 UI는 아래와 같다.

화면단은 사람에 따라 다를 수 있으니 참고만 하고 넘어가도록 하고,
주요 기능에 필요한 FastAPI 코드를 알아보자.
먼저, 다음과 같이 파일을 첨부했을 때 등장하는 이미지 컴포넌트가 필요하므로 /file-upload 엔드포인트를 만들자.

이를 위해 엔드포인트 라우터 부분과 main.py 부분을 나누어서 작업했다.
./main.py
import uvicorn

if __name__ == "__main__":
    # Start the FastAPI application via uvicorn
    # reload=True makes the server reload on code changes
    uvicorn.run("app.main:app", host="localhost", port=8000, reload=True)
./app/main.py
from fastapi import FastAPI
from fastapi.middleware.cors import CORSMiddleware
from fastapi.responses import HTMLResponse
from fastapi.staticfiles import StaticFiles
from app.core.config import settings
from app.api.v1.router import api_router
from pathlib import Path

# Initialize FastAPI app with metadata
app = FastAPI(
    title=settings.PROJECT_NAME,
    description="FastAPI Base Template with modern structure and weather API proxy.",
    version="1.0.0",
    openapi_url=f"{settings.API_V1_STR}/openapi.json" if settings.DEBUG else None,
)

# Configure CORS Middleware
# Allows all origins for local development, customize as needed
app.add_middleware(
    CORSMiddleware,
    allow_origins=["*"],
    allow_credentials=True,
    allow_methods=["*"],
    allow_headers=["*"],
)

# Include Central API Router
app.include_router(api_router, prefix=settings.API_V1_STR)

# Mount static files for uploads
upload_path = Path("uploads")
upload_path.mkdir(exist_ok=True)
app.mount("/uploads", StaticFiles(directory="uploads"), name="uploads")
./app/core/config.py
from pydantic_settings import BaseSettings, SettingsConfigDict


class Settings(BaseSettings):
    model_config = SettingsConfigDict(
        env_file=".env", env_file_encoding="utf-8", extra="ignore"
    )

    PROJECT_NAME: str = "FastAPI Project"
    API_V1_STR: str = "/api/v1"
    DEBUG: bool = True

    WEATHER_API_URL: str = (
        "https://dev-agri.todayjeju.net/api/datahub/v0/weather/nearest-grid"
    )


settings = Settings()
./app/api/v1/file_upload.py
from fastapi import APIRouter, File, UploadFile, HTTPException
from fastapi.staticfiles import StaticFiles
import shutil
from pathlib import Path
from datetime import datetime
import os

router = APIRouter()

UPLOAD_FOLDER = Path(os.getcwd()) / "uploads"
UPLOAD_FOLDER.mkdir(exist_ok=True)

ALLOWED_EXTENSIONS = {"png", "jpg", "jpeg", "gif", "webp"}


@router.post("/file-upload", summary="file upload")
async def fileUpload(file: UploadFile = File(...)):

    file_ext = file.filename.split(".")[-1].lower()
    if file_ext not in ALLOWED_EXTENSIONS:
        raise HTTPException(status_code=400, detail="Invalid File Type")

    timestamp = datetime.now().strftime("%Y%m%d_%H%M%S_")
    filename = timestamp + file.filename
    filepath = UPLOAD_FOLDER / filename

    with open(filepath, "wb") as f:
        shutil.copyfileobj(file.file, f)

    file_url = f"http://localhost:8000/uploads/{filename}"

    return {"url": file_url, "filename": filename}
파일 업로드 엔드포인트 파일을 중점적으로 보자면,
업로드 폴더를 만들어, File 형태의 데이터를 받아 로컬 서버에 올려주는 방식이다.
이는 배포 시 따로 Superbase나 AWS_S3 같은 서버를 이용할 수도 있지만,
필자같은 경우 아직 배포 단계까진 가지 않을 예정이므로, 로컬에서만 처리해주자.
이제, 파일 업로딩하는 작업을 해주었으니, 채팅 보내기, 채팅 가져오기, 채팅 지우기, LLM 채팅 같은 채팅 작업을 해주어야 한다.
우리는 로컬에서 1:1 대화를 가정하고 할 것이므로 WebSocket은 사용하지 않겠다.
따라서, 메시지 히스토리에 계속 저장하는 방식으로 해 줄 예정이다. (물론 서버 재시작 시에는 초기화될 것이다)
./app/api/v1/chat.py
from fastapi import APIRouter
from datetime import datetime
import uuid
from transformers import pipeline
from PIL import Image
from typing import Optional
import asyncio
from concurrent.futures import ThreadPoolExecutor

router = APIRouter()

messageHistory = []

# 가벼운 모델 전역 로드
captioner = None
executor = ThreadPoolExecutor(max_workers=1)


def load_model():
    global captioner
    try:
        captioner = pipeline("image-to-text")
        print("LLM 모델 로드 완료")
    except Exception as e:
        print(f"LLM 모델 로드 실패: {e}")


@router.on_event("startup")
async def startup_event():
    load_model()


@router.post("/add-chat", summary="add-chat")
async def addChat(message: str, fileUrl: str):
    chat_id = str(uuid.uuid4())
    timestamp = datetime.now().isoformat()

    chat_item = {
        "chat_id": chat_id,
        "message": message,
        "fileUrl": fileUrl,
        "timestamp": timestamp,
        "isMe": True,
    }

    messageHistory.append(chat_item)

    return chat_item


@router.get("/get-chat", summary="get-chat")
async def getChat():
    return messageHistory


@router.delete("/delete-chat", summary="delete-chat")
async def deleteChat(chat_id: str):
    global messageHistory

    # 삭제할 메시지 찾기
    deleted_index = None
    for i, chat in enumerate(messageHistory):
        if chat["chat_id"] == chat_id:
            deleted_index = i
            break

    if deleted_index is None:
        return {"status": "not found", "chat_id": chat_id}

    # 내 메시지(isMe=True)인 경우, 그 다음 LLM 응답도 함께 삭제
    deleted_chat = messageHistory[deleted_index]
    if deleted_chat.get("isMe") and deleted_index + 1 < len(messageHistory):
        next_chat = messageHistory[deleted_index + 1]
        if not next_chat.get("isMe"):  # 다음이 LLM 응답이면
            messageHistory = [chat for chat in messageHistory if chat["chat_id"] not in [chat_id, next_chat["chat_id"]]]
        else:
            messageHistory = [chat for chat in messageHistory if chat["chat_id"] != chat_id]
    else:
        messageHistory = [chat for chat in messageHistory if chat["chat_id"] != chat_id]

    return {"status": "deleted", "chat_id": chat_id}


def analyze_image(fileUrl):
    """이미지 분석 (동기 함수)"""
    try:
        result = captioner(fileUrl)
        return result[0].get("generated_text", "") if result else "이미지 분석 실패"
    except Exception as e:
        return f"이미지 분석 중 오류: {str(e)}"


@router.post("/llm-chat", summary="llm-chat")
async def llmChat(message: Optional[str] = None, fileUrl: Optional[str] = None):
    global messageHistory, captioner

    llm_response = ""

    # 이미지가 있으면 분석 (비동기)
    if fileUrl and fileUrl.strip() and captioner:
        loop = asyncio.get_event_loop()
        llm_response = await loop.run_in_executor(executor, analyze_image, fileUrl)
    # 이미지가 없으면 메시지 사용
    elif message and message.strip():
        llm_response = message
    else:
        return {"error": "message 또는 fileUrl이 필요합니다"}

    # LLM 응답을 messageHistory에 저장
    llm_chat_id = str(uuid.uuid4())
    llm_timestamp = datetime.now().isoformat()

    llm_chat_item = {
        "chat_id": llm_chat_id,
        "message": llm_response,
        "fileUrl": "",
        "timestamp": llm_timestamp,
        "isMe": False,
    }

    messageHistory.append(llm_chat_item)

    return llm_chat_item
먼저 addChat() 함수를 살펴보면, message와 fileUrl을 가져와서, 전체 messageHistory에 추가하는 과정이다.
그 messageHistory()를 getChat()에서 받아오는 형태이고,
deleteChat()에서 자신의 메시지와, LLM 메시지를 모두 삭제하는 형태이다.
LLM 메시지 로직이 조금 복잡한데, 간단하게 설명하자면,
transformer의 pipeline을 이용하여 image-to-text 태스크를 통해 result를 받아 넘겨주는 형태이다.
다만 이미지 파일이 넘어오는지 안 넘어오는지를 비동기 처리했다.
실제 받는 데이터는 LLM이 실제 이미지를 받아 캡셔닝한 형태가 된다.

최종적으로 다음 엔드포인트를 router.py에서 연결해줌으로, API 구성이 완료되었다.
from fastapi import APIRouter
from app.api.v1.endpoints import hello, fileUpload, chat

api_router = APIRouter()

# Include endpoints routers
api_router.include_router(hello.router, tags=["default"])
api_router.include_router(fileUpload.router, tags=["fileUpload"])
api_router.include_router(chat.router, tags=["chat"])
이제 좀 더 발전해서, 다음 같이 답변 형식을 정해주는 형태로 변경해보자.

FastAPI에서 LLM 챗 코드만 수정해주면 될 것 같다.
import textwrap
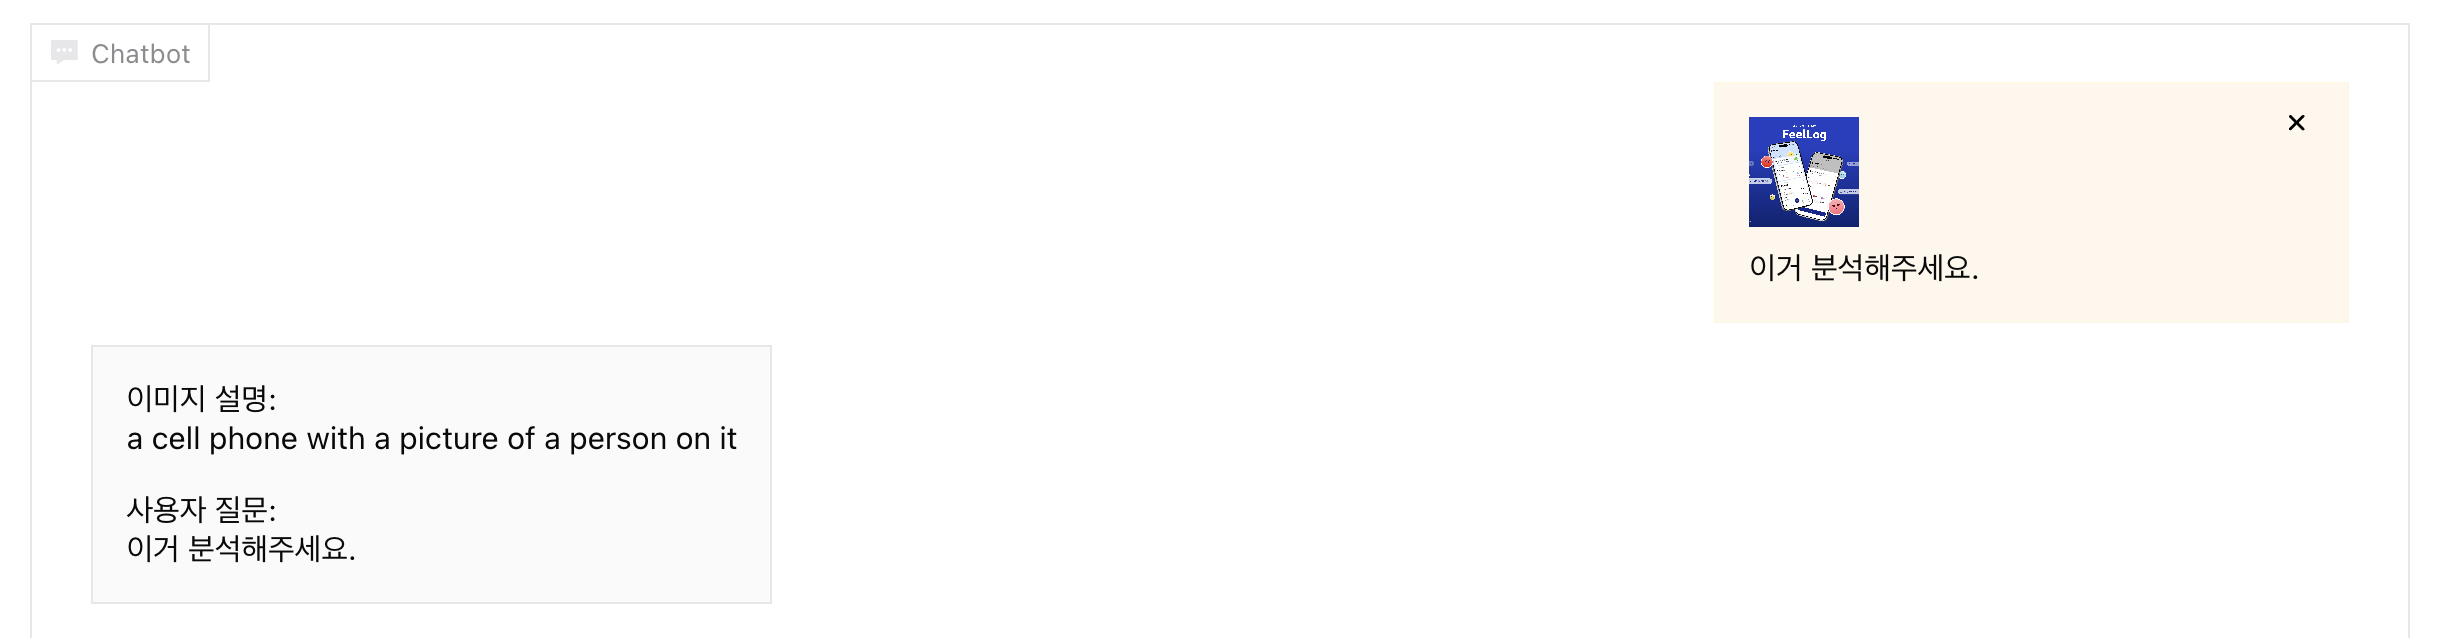
prompt = textwrap.dedent(
f"""이미지 설명:
{llm_response}
사용자 질문:
{message if message else 'N/A'}
"""
)
llm_chat_item = {
"chat_id": llm_chat_id,
"message": prompt,
"fileUrl": "",
"timestamp": llm_timestamp,
"isMe": False,
}
messageHistory.append(llm_chat_item)
여기서 prompt 형식 (띄어쓰기 등)을 맞춰야 하므로, 프론트엔드에서 조금 처리가 필요할 것 같다.
<span className="whitespace-pre-line">{chatContent.message}</span>
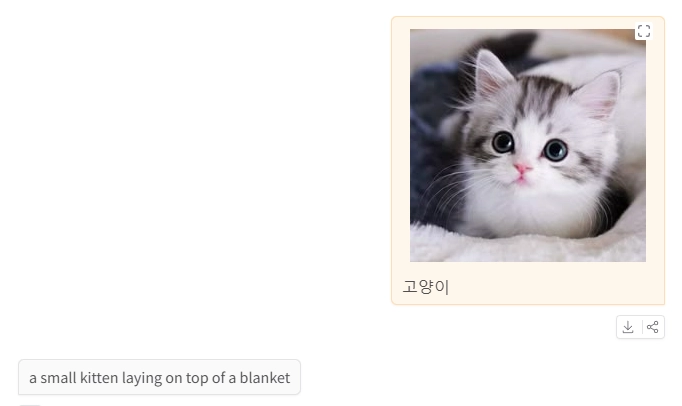
그럼 다음과 같이 구현할 수 있다.
이제 마지막으로, 분석한 이미지에 대한 추가 질문에 대한 답변을 구현해보자.

그러기 위해서는 태스크를 하나 더 추가해야 한다. 추가 질문에 대한 답변 태스크는 text-generation 인데
앞서 위의 코드와 같이 전역 변수를 선언한 후 지역 변수처럼 사용할 것이다.
global generator = Nonedef load_model():
global captioner, generator
try:
captioner = pipeline("image-to-text")
generator = pipeline("text-generation", model="Qwen/Qwen2.5-1.5B-Instruct")
print("LLM 모델 로드 완료")
except Exception as e:
print(f"LLM 모델 로드 실패: {e}")
지역 변수처럼 사용을 위해서는 함수 내에서 global 예약어를 사용해야 하며, 파이프라인으로 연결해서 변수에 저장시킨다.
이 함수는 위에서 처럼 앱이 시작하는 동시에 로드될 것이므로, 정상적으로 처리된다면 LLM 로드 완료가 콘솔에 뜰 것이다.

이를 통해 메인 로직은 llm-chat에서 수정해줄 것인데, 이미지 설명을 가져오는 것이 공통되므로
current_caption 전역변수로 로직을 조금 수정해줄 것이다.
current_caption = ""if fileUrl and fileUrl.strip() and captioner:
loop = asyncio.get_event_loop()
llm_response = await loop.run_in_executor(executor, analyze_image, fileUrl)
current_caption = llm_response
prompt = textwrap.dedent(
f"""이미지 설명:
{current_caption}
사용자 질문:
{message if message else 'N/A'}
"""
).strip()
처음에 했던 이미지를 보냈을 때 이미지를 분석하는 로직이다. 코드가 복잡하긴 하지만 간단하게 설명하자면,
LLM을 통해 캡션명 받은 것을 current_caption으로 받아주어, 그 뒤에 사용자가 이미지에 대해 추가로 질문했을 때
LLM에 current_caption를 한번 더 넘겨주겠다는 의미로 변수를 관리했다.
else:
            new_prompt = textwrap.dedent(
                f"""\
                당신은 이미지 분석 AI입니다.
                다음 이미지 설명을 참고해서 사용자의 질문에 한 문장으로 답변하세요.

                이미지 설명:
                {current_caption}

                질문:
                {message}

                답변:\
            """
            )
            print(new_prompt)

            # 비동기로 generator 실행 (FastAPI 이벤트 루프가 차단되는 것 방지)
            if generator:
                loop = asyncio.get_event_loop()
                result = await loop.run_in_executor(
                    executor,
                    lambda: generator(
                        new_prompt,
                        max_new_tokens=50,
                        return_full_text=False,
                        pad_token_id=generator.tokenizer.eos_token_id,
                    ),
                )
                prompt = (
                    result[0].get("generated_text", "").strip()
                    if result
                    else "답변을 생성하지 못했습니다."
                )
            else:
                prompt = "텍스트 생성 모델이 로드되지 않았습니다."
    else:
        return {"error": "message 또는 fileUrl이 필요합니다"}
다음은 이미지가 아니라 텍스트를 보냈을 때 처리 방법이다. LLM 프롬프트를 통해 앞서 받았던 이미지 설명과 질문을 같이 보내고
그에 대한 대답을 같이 받아오는 형식이다. 최종적으로 JSON에는 prompt 변수가 들어가므로, 비동기 설정을 해주어서
generator 함수를 통해 답변을 받거나, 답변이 생성하지 못했다는 경고메시지를 받게 된다.
'AI > LLM' 카테고리의 다른 글
| 허깅 페이스(Hugging Face) - 음성 비서 앱 (7) (0) | 2026.06.05 |
|---|---|
| 허깅 페이스(Hugging Face) - 감정 분석 앱 (6) (0) | 2026.06.05 |
| 허깅 페이스(Hugging Face) - 트레이너 API (4) (0) | 2026.05.28 |
| 허깅 페이스(Hugging Face) - 데이터 파인튜닝 프로세싱 (3) (0) | 2026.05.28 |
| AI 활용 - 클로드 코드 스킬(Claude Code Skills)이란? (0) | 2026.05.27 |